
7 july 2020: 8:00 AM (approximately 1 hour)
Join Zoom Meeting:
- Meeting Cancelled
- Meeting ID:
- Password:
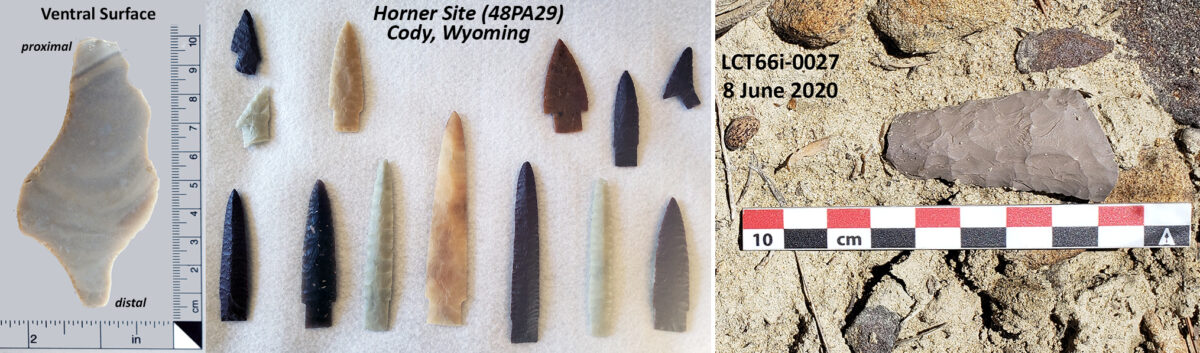
Evidence for the manufacture and use of stone tools by human ancestors begins at least 2.5-2.6 million years ago1 to perhaps as early as 3.4 million years. 2 Give or take a million years for the beginning, there can be little arguement that stone tools have played a major role in human life. In addition to their fundamental importance as ways to access a wider variety of foods and materials, stone tools are important to archaeology since they are among the best preserved evidences of past actions. While materials like hides, fiber, baskets, wood, and bone are all susceptible to decay, for the most part stone tools can withstand a wide range of processes and still show evidences of their manufacture and use. Stone tools are abundant, diverse, and durable sources of information about the human past and having a basic understanding of tool manufacture and use is fundamental examining the prehistoric archaeologial record. The images of at the top of this page range from a piece of chipped stone produced specfically for this lesson (on the left), to a series of plastic casts of points from the Horner Site3 near Cody, Wyoming (middle), and an artifact found, recorded and left in place while making this webpage (right side image; described in the Catch and Release video on the What is Archaeology? page of this series. ).
Activities:
These activities may help you to think about two important aspects of the archaeological record: 1) tool identification, use, and interpretation, and 2) preservation.
- Walk around your house and/or neighborhood and identify materials that would likely be preserved in the archaeological record a 1000 years from now, and which might not. How would the difference between the types of things preserved versus those lost color your interpretation of what life was like?
- Make a map of the “site” you live in (e.g., your room, your house, your neighborhood), identify what are the main activities that take place there. What tools/artifacts are associated with those activities? How would an archaeologist be able to interpret activities from the artifacts found in your site?
- Make a list of every tool you use during the day. Remember that tools are not just things like hammers and saws, they would include items like a tooth brush, a cereal bowl, or a car. Does every tool have just one use, or can you use it for many things? Where do you get your tools? What happens if you don’t have the tool you need? How to tools make your life easier? What complications do they introduce? What sorts of tools might someone living in Cody 100 years ago and 5000 years ago have needed in their daily activities? How do the tools you use help describe your life?
- Do a ‘thought experiment’ and consider a jigsaw puzzle that you want very much to assemble. What would would the final puzzle look like if some took away many of the pieces before you could put it together? Although each piece of the puzzle looks pretty much like all the others (that’s what makes it a challenge, right?), if pieces are missing the picture will be incomplete, and if too many are gone, you may not even be able to tell what the picture is. Every artifact is like a puzzle piece, it has to be present (and in its correct position) for us to have a reasonable chance to begin understanding the past.
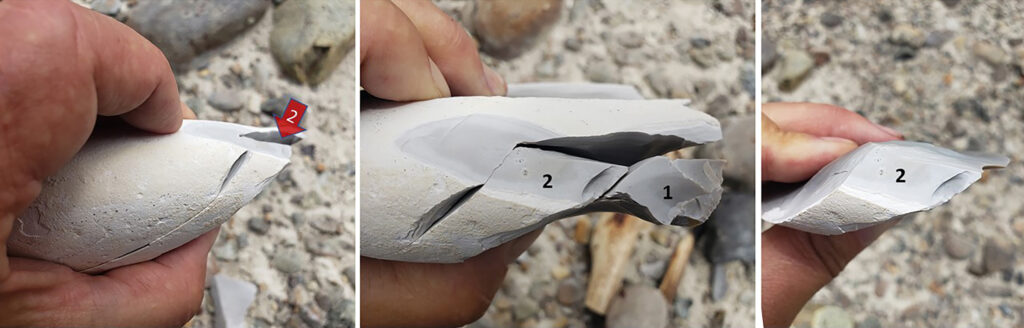
The precussion flake video shows use of a hammer stone to remove two flakes from a core. Some of the landmarks on the ventral surface (the side of the flake nearest to the core) are labeled. These as well as the dorsal (outer, away from the core) are also shown on the image below. Also indicated are the directions that the force (hammerstone strike) was applied for both the first flake removed (1) as well as the second (2), which is the flake shown here:

The video showed two different view of two strikes to the edge of a core. The location where each strike (force) was applied is called the platform, and is said to be the proximal end of the flake. The first flake removed (1) produced the area labeled as “flake scar” in the image above.
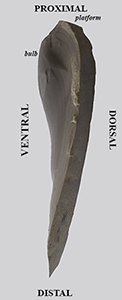
Another view of Flake 2 showing basic terms of orientation a couple key landmarks. The flake was struck from the core by hitting it on the platform (proximal end). The side that was toward the outside of the core and still has some of the outer surface (cortex) and the scars from previous flake removals is called the dorsal surface. The side that detached from the core has both the bulb and a series of ripples orginating at the point where force was applied and radiating outward from there.
After the initial removal of a large flake (like Flake 2, which in further modified in the Retouching and Debitage video below) from a core, it can undergo additional modification and shaping by retouching edges and faces. Each of these processes (intial removal and subsequent working) produces not only what eventually may be a stone tool, but also lots of little bits and pieces. These small pieces of chipped stone that are not destined for additional modifcation or use all called debitage. The next video takes a quick look at these next sorts of modification and the by products produced. This introduction to stone tool presented here does not take us much beyond the basic first steps. It covers the basic terms and concepts of chipped stone technology and talks a bit about some of the more abundant components of the archaeological record — the debris from working stone.
The final video in this group looks at the debitage itself, and on how the cluster produced for these exercises shares many attributes with rare, but very important archaeological cases. The record of past activities is recorded not just in the items made (such as stone tools)- it’s also recorded in the materials left from manufacture and use. For example, the distributions of debitage across a site can often provide information on where things happened with greater fidelity than the distribution of artifacts alone.An example of an archaeological site mapped after the chipped stone was exposed by a forest fire is give. The associations, positions, and groupings of items (their context) provides very imporant information about past activities and although not as spectacular and time sensitive (allows us to estimate how old it is) as the arrow and dart points, the type of activity-specific information provided by data from things like debitage clusters are invaluable in piecing together a more complete picture of the past. Just like removing the points from a site makes it very difficult to get an initial age estimate, moveing or removing the other little bits and pieces is also very damaging (and illegal on Federal lands) to the archaeological record — it’s vandalism and if taken away, theft. Feel free to pause the video if some of the text passes too quickly.
Here are some links to other videos that give a more general overview to the process and practice of chipped stone tool manufacture (flint knapping) by several experts in chipped stone technology in the Wyoming area:
Bruce Bradley https://youtu.be/uKJlOHt3qHU
Bob Patten https://youtu.be/jRN4IbXOL2k
Additional short, limited topic videos are in the works (e.g., soft hammer percussion, bifacial reduction, debitage analysis, spatial analysis). A very brief discussion of projectile point shapes and age estimates is on the Telling Time page.
In terms of stone tool manufacture and use, we’ve not gotten even all the way through the A’s in the ABC’s. Have not covered ground or pecked stone at all. Have just gotten to the most back steps in flaking stone. But, the ability to predictably remove large, sharp flakes from a core is fundamental. Once you’ve gotten to that point, you’ve able to make a high percentage of the basic tools that would be essential for day-to-day activities. It’s likely that other than the very young, every person in a stone tool using group could easily deal with the basics of flake production and retouch. For an introduction, seems like a good place to stop, with the reminder that it would take a lifetime of practice to become a master flintknapper. The basics are easy, beyond that takes lots of time and effort. But remember, even though the tools themselves carry a lot of potential information (if we know where they’re from), the rest of the stone tool assemblage, even the discarded pieces, can provide important information and should not be disturbed.
Next Lesson: Telling Time
Footnotes:
- Early stone tools from Gona, Ethiopia.
- Indications of possible stone tool use based on possible cut marks on bones from Dikika, Ethiopia or of very early stone tools from Lomekwi, Kenya.
- These casts and many others are available for purchase from Mammoth Run Lithic Casting, and are a great way to be able to look at high quality replicas of some of Wyoming’s classic artifacts.